Student Enrollment Wizard
Enroll to Courses and Sessions
Table of Contents
Student Enrollment Wizard
(Note: For unenrolling or withdrawing from a Course, see here instead.)
The Student Enrollment Wizard is used for enrolling students to Course Offerings and Sessions.
It can be used by both students and the admin.
It can be exposed on the Student Community, for students to use it themselves (see: RIO Ed - My Program (Aura)).
It can also be exposed on the Program Enrollment record in the internal Salesforce console, for the admin to enroll students on their behalf (see: RIO Ed - My Pathway (Aura)).
- They tend to share the same validations and configuration.
- For instance, the Course "Enroll" button display will depend on the "Eligible to Enroll" flag in the Program Enrollment.
This article will be a simple guidance to do an enrollment from student and internal users perspective.
Student perspective
The following describes how a student will enroll to Course Offerings and Sessions.
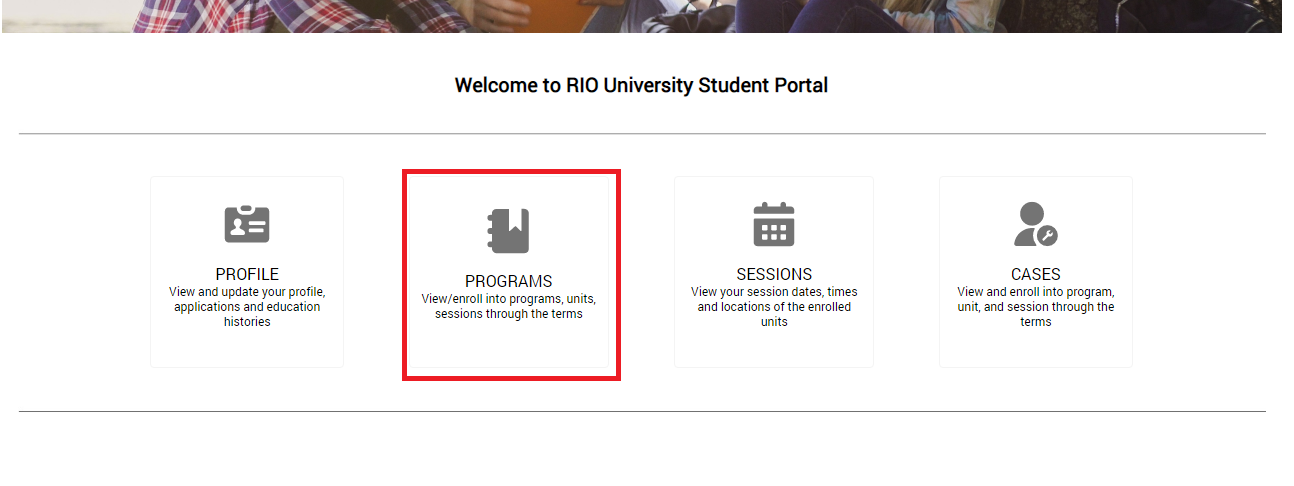
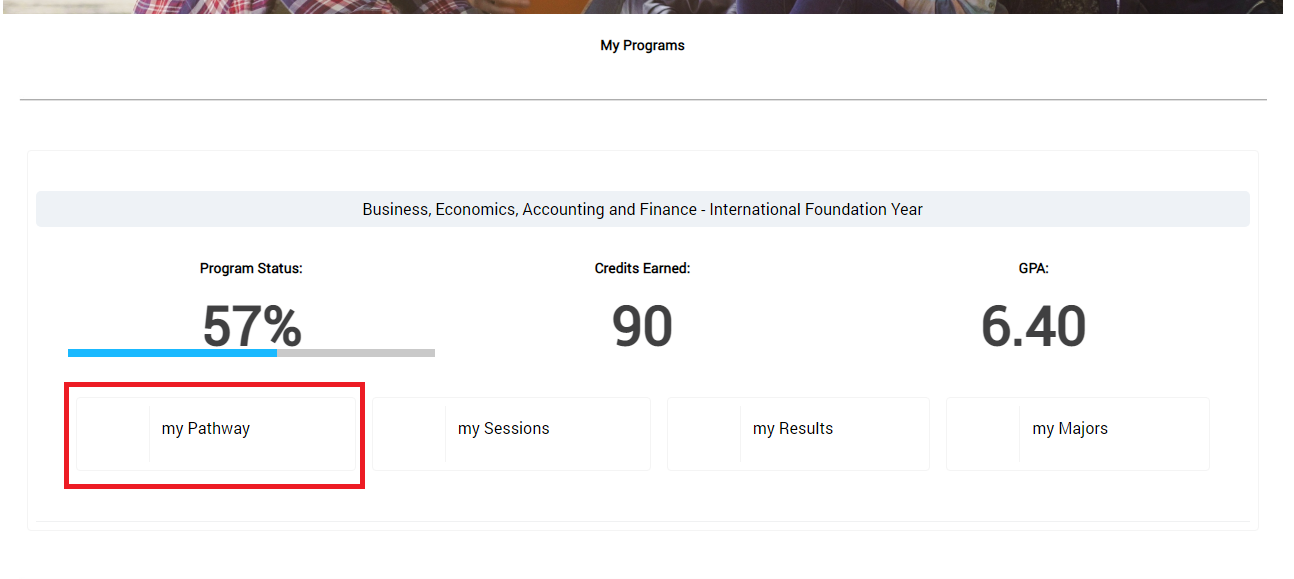
1. Assuming the student has logged in through the portal, please click on "Programs" and "My Pathway" afterwards.
2. Select the respective Term you wish to enroll into. The 'Credits Enrolled' are referred (rolled up) from the amount of credits enrolled in PE Pathway.
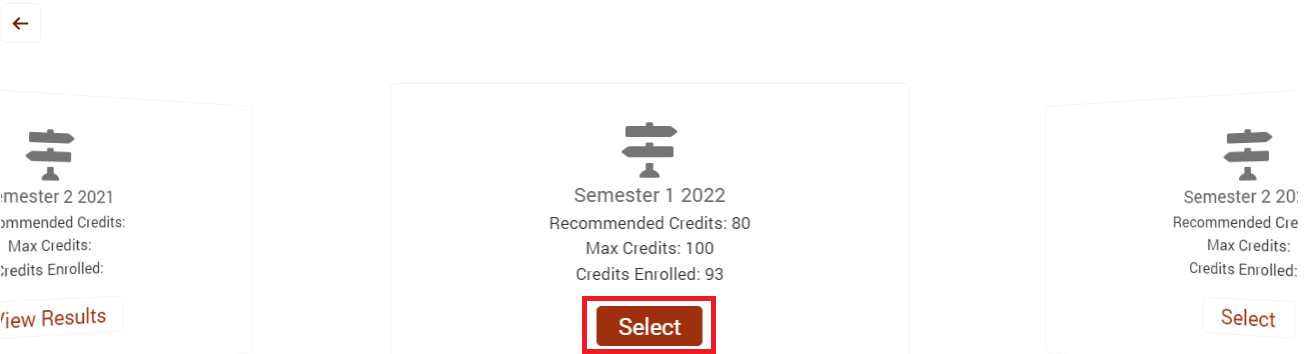
If the view is still the enrollment view (the "Select" button is still visible), this means that the Term has not ended yet. The "View Results" will only appear after the Term end date has passed.
3. From RIO Education 3.14 onwards, students can use the custom filters to search for specific / relevant Course Offerings.
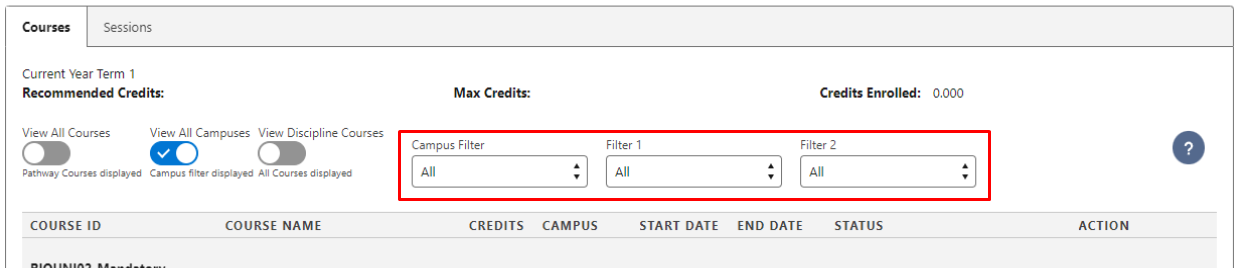
- When students view the Courses available for enrollment, the field value for the Custom Filter 1 and Custom Filter 2 will be retrieved from their related Program Enrollment, and will be matched against target fields on the Course Offerings.
- The admin will need to configure the field mapping and enable the Custom Filter on the RIO Ed - My Program (Aura) component (since this is for the Student Community view).
4. Select the Course Offerings you wish to enroll into.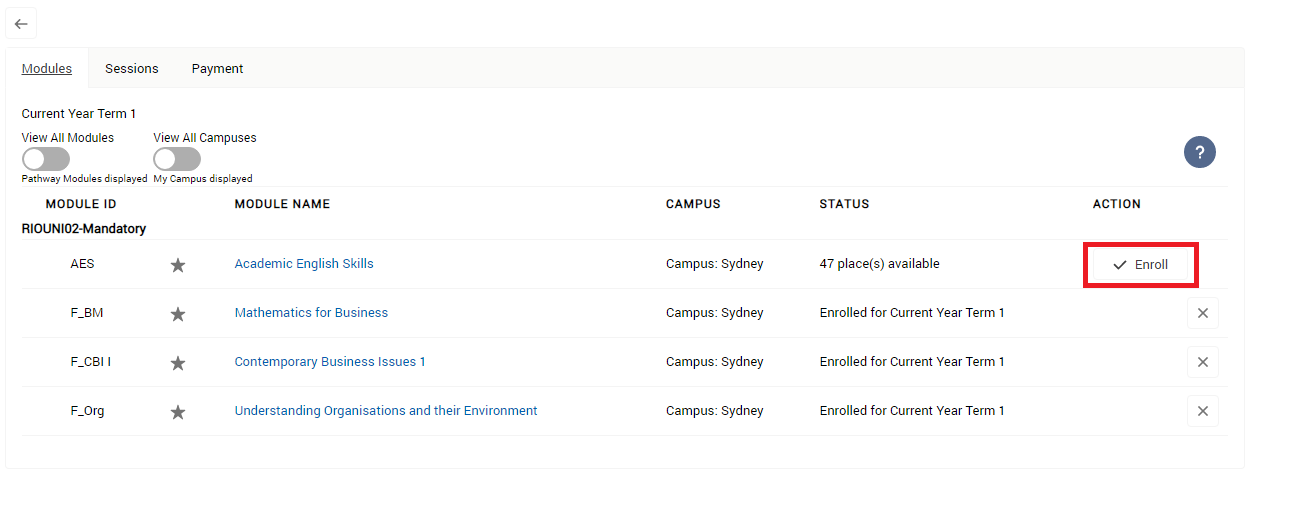
As of v3.8.3, an additional info message will be shown on the enrollment confirmation to inform students about the required co-requisite Courses. The co-requisite requirements will now always be set as met (see here for more information).

As of v3.12, you can configure the enrollment wizard to show the student's missed/failed Courses.
You can also prevent students from enrolling to Courses and Sessions, without affecting the admin (who can manage the enrollment on the students' behalf). See below for details.
Potential errors you may encounter
You may encounter some errors when enrolling (or unenrolling).
See here for a list of potential errors and resolutions.
Common examples include:
- If the current time is past the Enrollment Close Date (at the Course Offering or Term level), you will not be able to enroll.
(See here if you are unable to find the enroll button.)
- On the other hand, if there is an error that says “This Course Offering is not currently accepting enrollments” (when trying to enroll), it could be due to the Course Offering's status.
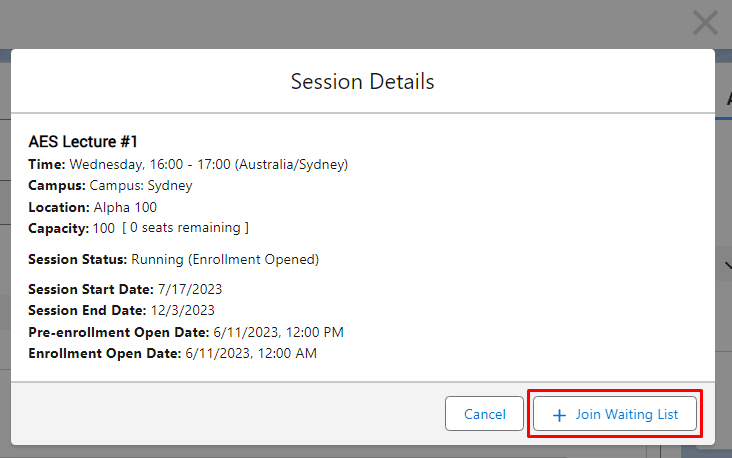
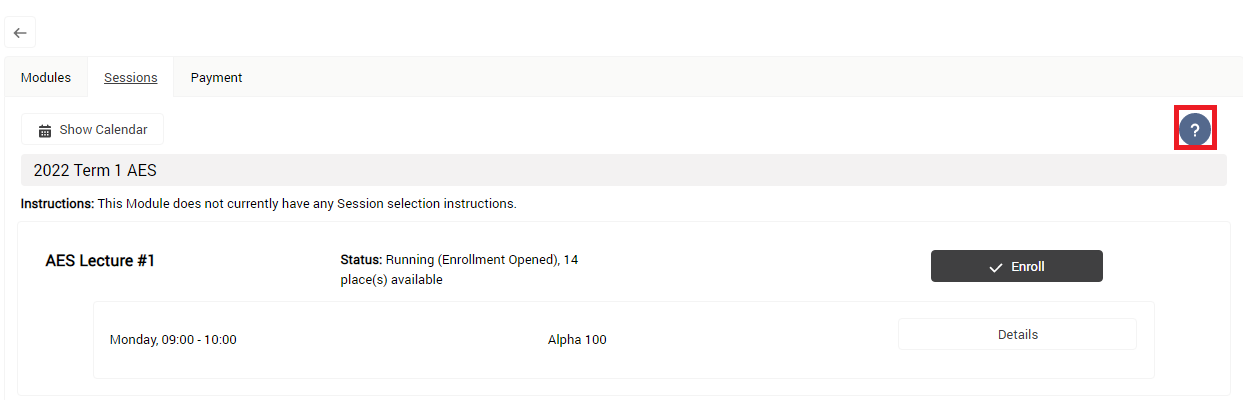
5. Navigate to the "Sessions" tab and enroll the Sessions that are available and suit you the best.
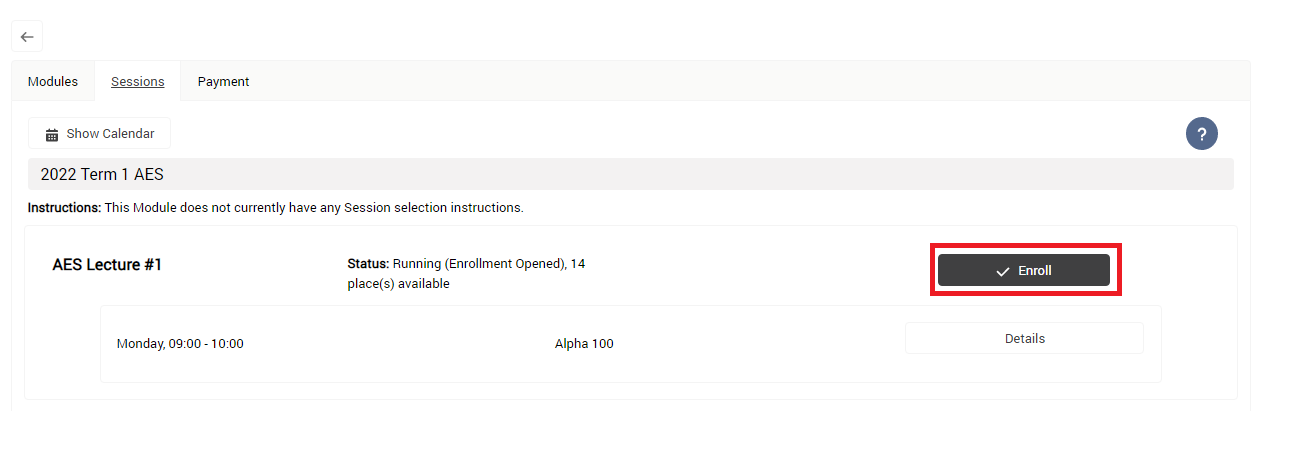
If the Session has been fully enrolled (capacity has been maxed out), you can join the waiting list, by viewing the 'Details' and clicking on 'Join Waiting List'. See here for details on Session Waitlists.

Note:
You can prevent students from enrolling to Sessions, and let the admin manage that instead.
If the "Self Enrollment Disabled" checkbox on the Session object is checked, students will not be able to enroll to the Session by themselves in the Student Community.
Simultaneous enrollment
There are potential situations where there are multiple students enrolling to a same Course at the same time. This results in a high volume of requests, which may lead to error.
As of v3.11.4, the enrollment wizard is enhanced to automatically retry and enroll the students to the Course again.
When the enrollment wizard encounters a high volume of requests, a warning message "This may take a little bit longer due to high volume of requests." will be prompted.
The enrollment wizard will retry the request, until:
- It succeeds in enrolling the student to the Course, OR,
- The available places in the Course have ran out,
- The "Join Waiting List" button has been removed to standardize the process of handling retry for enrollment.
OR,
- The "Join Waiting List" button has been removed to standardize the process of handling retry for enrollment.
- it reaches the maximum attempts configured (more details below on how it works).
How does simultaneous enrollment work?
The locking mechanism for enrolling to Courses is enhanced to handle simultaneous enrollment.
The enrollment wizard will automatically retry to enroll the student based on the configured maximum number of attempts.
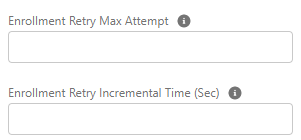
A few configurable options are introduced to the RIO Ed - My Program (Aura) and RIO Ed - My Pathway (Aura) components:
- Enrollment Retry Max Attempt - The maximum number of retry attempts for enrolling to a Course.
- Enrollment Retry Incremental Time (Sec) - The retry interval for each attempt in seconds.
The formula below is used to calculated the maximum retry attempts required for all seats to be taken.
(Note: When more seats capacity are offered in a Course Offering, the max attempt required for all seats to be taken will also be higher.)

Looking at an example for Course A and Course B:
- Course A - 20 seats are offered.
Thus, the maximum attempt to reach full capacity will be 20/5 = 4 attempts.
- Course B - 100 seats are offered.
Thus, the maximum attempt to reach full capacity will be 100/5 = 20 attempts.
(Note: Both of the values above are calculated based on the worst case scenario by assuming the number of simultaneous enrollment is more than or equal to the seats offered.)
After deriving the value for X, we can then conclude the following.
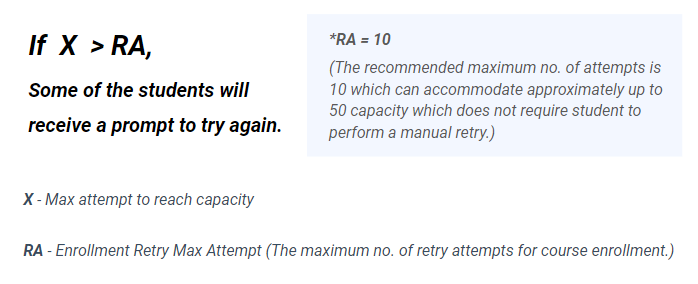
Based on the logic above,
- Course A - Require 4 max attempts to reach full capacity.
This indicates that within 4 retry attempts, the enrollment will be finalized for all students.
(Note: The term "finalized" here is referring that some of the students will have successful enrollment, and the remaining of them will be prompted with a "Max Capacity Reached" message.)
- Course B - require 20 max attempts to reach full capacity.
This indicates that after the 10th retry attempts, the system will prompt the remaining students to try again.
Notes on simultaneous enrollment
1. Is it necessary to increase the default RA to match the value in X?
Configuring a higher RA value to match the value in X is not necessarily a best practice.
Looking at an example below for Course B,
X = 20. By setting RA = 20 will mean higher waiting time for students to finalize their course enrollment.
Therefore, it is okay to have lower value of RA to reduce the loading time for students. In exchange, some students will be prompted to try again.
2. Is it possible to configure the prompt message for students to try again?
Yes, it is possible to customize a message to prompt the students to try again.
For example, the default error message is "Unfortunately, there are too many requests at the moment. Please try again later.", but you can customize this message, by updating the "Enrollment_Errors_For_Retry" custom label (only available in v3.12 and above).
Salesforce internal user perspective
The following describes how an internal user (i.e. admin) will enroll students to Courses and Sessions, on their behalf.
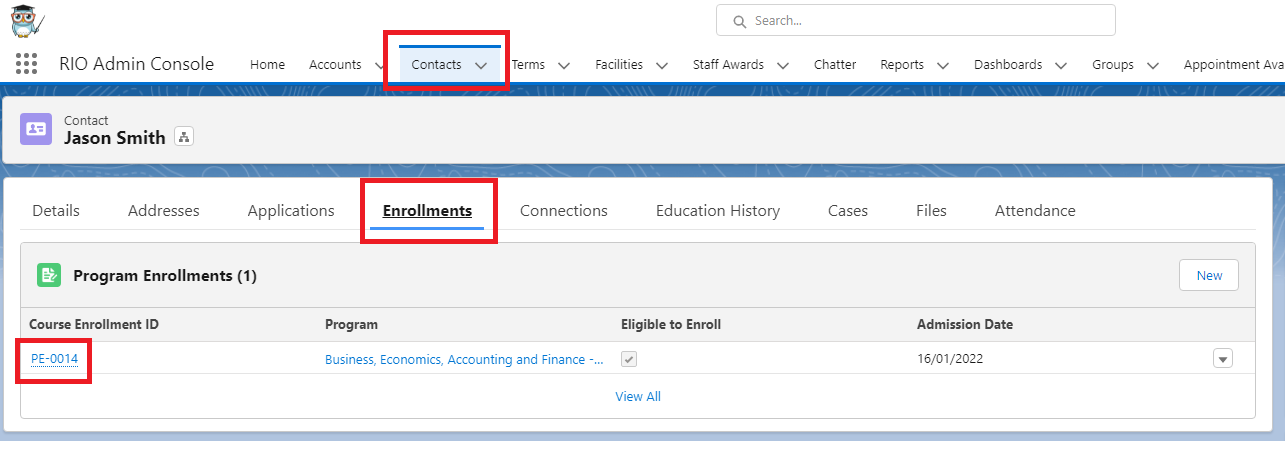
1. To enroll a student, please navigate to the respective Program Enrollment record.
(Contact > Enrollments > Course Enrollment ID)
2. Navigate to the Pathway tab and you will be able to select the respective Term.

If the view is still the enrollment view (the "Select" button is still visible), this means that the Term has not ended yet. The "View Results" will only appear after the Term end date has passed.
3. From RIO Education 3.14 onwards, students can use the custom filters to search for specific / relevant Course Offerings.

- When students view the Courses available for enrollment, the field value for the Custom Filter 1 and Custom Filter 2 will be retrieved from their related Program Enrollment, and will be matched against target fields on the Course Offerings.
- The admin will need to configure the field mapping and enable the Custom Filter on the RIO Ed - My Pathway (Aura) component (since this is for the internal console view).
4. Internal users can now enroll the student to the Courses respectively by clicking the enroll button. Both the information populated and the filter available work exactly the same in the Community.
If the current time is still before the Enrollment Close Date (at the Course Offering or Term level), you will be able to enroll.
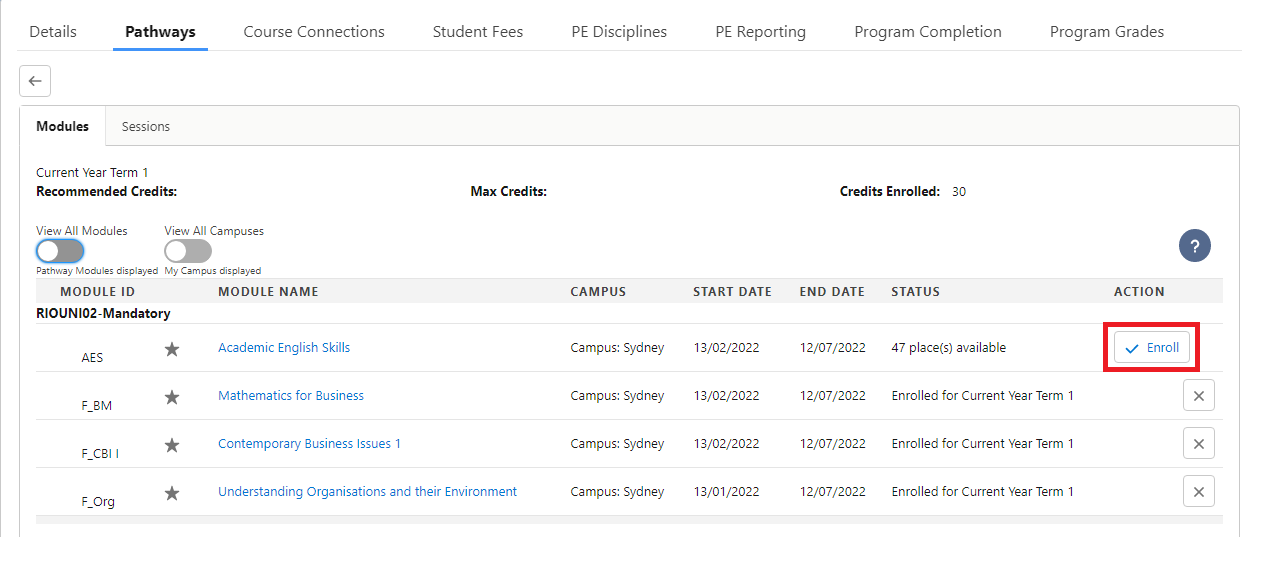
(See here if you are unable to find the enroll button.)
Clicking on the Course Name / Module Name will display the following information in a popup:
| Course description | Taken from the "Description" field in the Plan Requirement (Course) record. |
| Requirement description |
Taken from the "Requirement Description" field in the Plan Requirement (Course) record. |
| Fee amount | Taken from the "Fee Amount" field (Domestic or International depending on student's citizenship), which is under the Course Offering record. |
5. Navigate to "Sessions" and you can enroll the students into their respective Sessions.
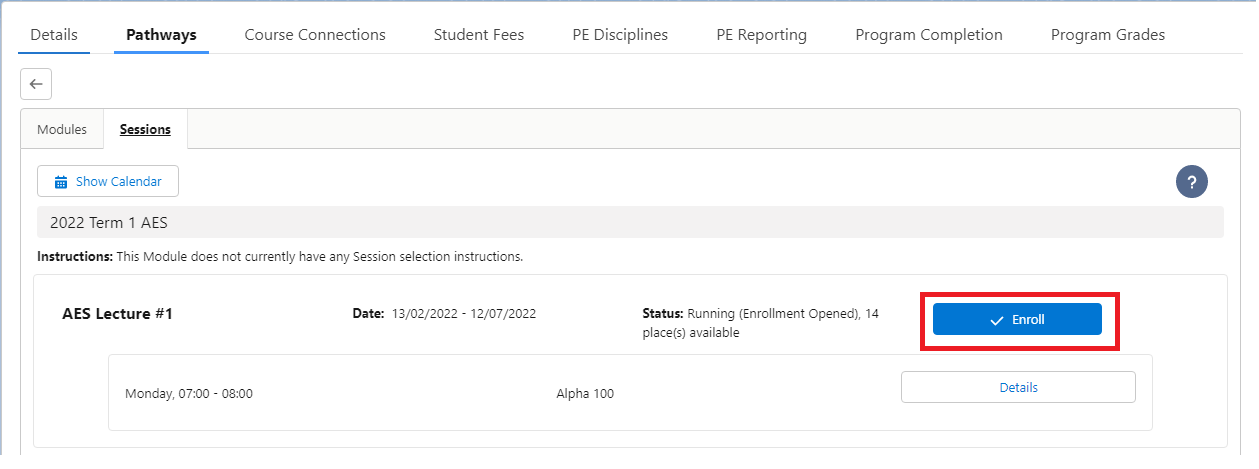
If the Session capacity has been maxed out (fully enrolled), you can add the student to the waitlist. See here for details on Session waitlists.
Note: For unenrolling or withdrawing from a Course, see here instead.
Notes
Enrolling to Course/Sessions without PE Pathway
As of v3.11, students can enroll for Courses and Sessions, even if the Program does not have a Pathway.
The wizard will hide the 'View all Courses' toggle if there is no Program Pathway linked on the PE Pathway, and automatically shows all Courses for the Program instead. This can give students the flexibility to choose any Course at any Term/semester.
For more information and setup, see more here.
Viewing failed/missed Courses from previous Terms
Prior to v3.12, if a student fails or misses a Course in a previous Term, and want to enroll to that Course in this Term, they need to click 'View All Courses'.
To avoid potential situations where students might overlook those Courses and forget to click 'View All Courses', the enrollment wizard can now show these:
- Mandatory Courses from previous Terms in the Enrollment Wizard, under the following conditions:
- The student either failed or did not enroll (missed) to the Course in a previous Term.
- A valid Course Offering exists for the Course in the current Term the student is enrolling in.
- The Pathway Unit specifically lists the Plan Requirement (Course) for the missed Courses.
- The student either failed or did not enroll (missed) to the Course in a previous Term.
This will require configuring the "Show Missed/Failed Courses" property to "All" on the RIO Ed - My Program (Aura) and the RIO Ed - My Pathway (Aura).
Prevent students from enrolling
The admin might wish to prevent students from enrolling, and the admin will handle the enrollment on the students' behalf instead.
- The admin will need to check the ‘Eligibility to Enroll’ checkbox on the students' Program Enrollments, to prevent them from enrolling to Course Offerings.
- The admin will need to check the 'Self Enrollment Disabled' checkbox at the Session level as well.
However, this will affect both the students (using the wizard on the Student Community) and the admin (using the wizard on the internal console).
(Supported from v3.12 onwards)
Since the admin wants to use the wizard himself / herself, the admin will need to edit the Program Enrollment page on the internal console and configure the RIO Ed - My Pathway (Aura) component.
- ignorePeEligibility.
- ignoreSelfEnrollment.
Icons for mandatory/required Courses
In the Enrollment Wizard, the Courses that are required for PE Disciplines are usually marked with either a square (mandatory).
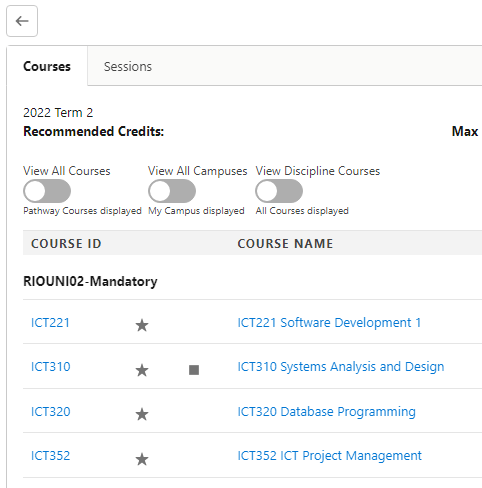
The icons will no longer appear if the PE Discipline status has been set to Withdrawn.
As of v3.11.2, take note that if the PE Discipline status is set to Withdrawn through other methods (e.g. the PE Discipline is unselected via the RIO Ed - My Majors (Aura) component), then the PE Discipline and related PE Discipline Requirements will be deleted.
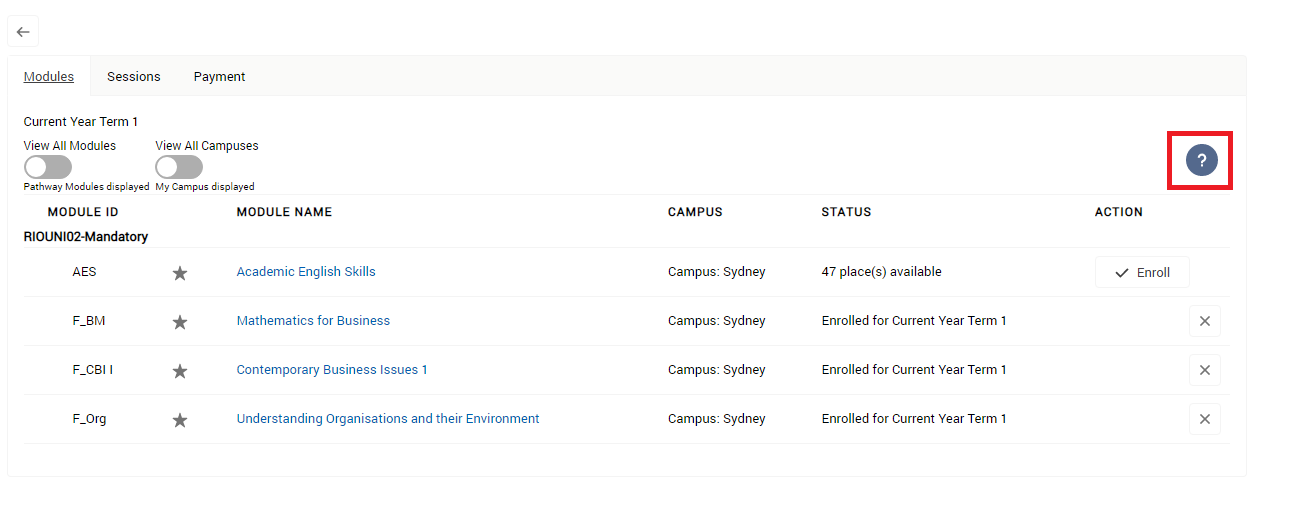
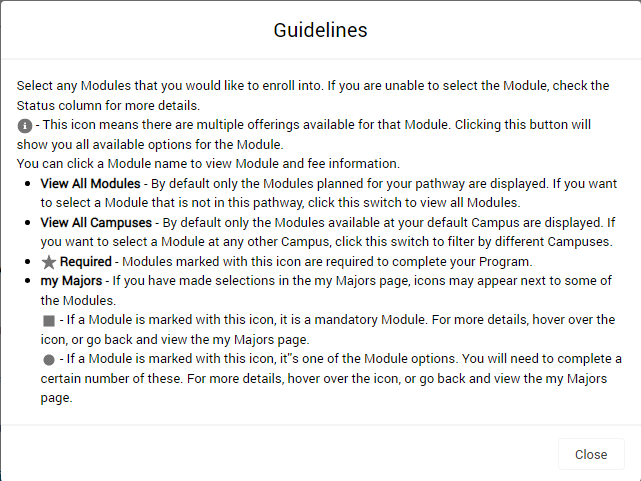
Question mark button for modules
This is a guideline for when you are considering which Courses to enroll into. It also explains the filter as well as the symbol being used.
Question mark button for Sessions
This is a guideline for when you are choosing which Session to enroll into.

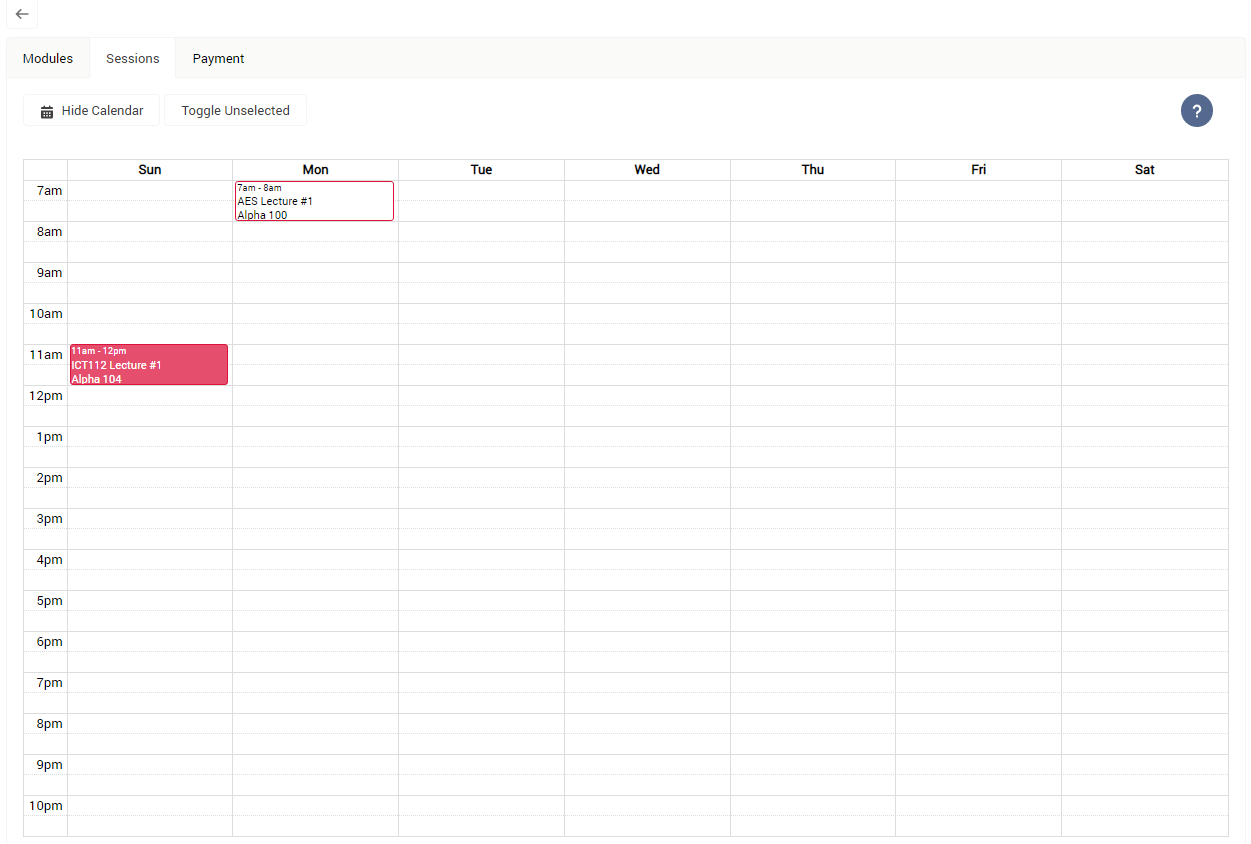
Calendar View Button in Sessions
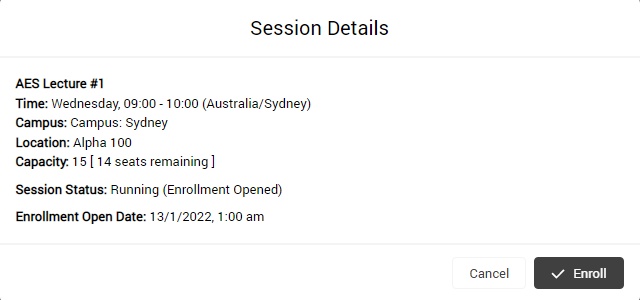
By clicking on this, it allows you to see and enroll the Session available through the calendar view. You can then click on the Session you prefer and a message box will pop up, populating the information for the Session.
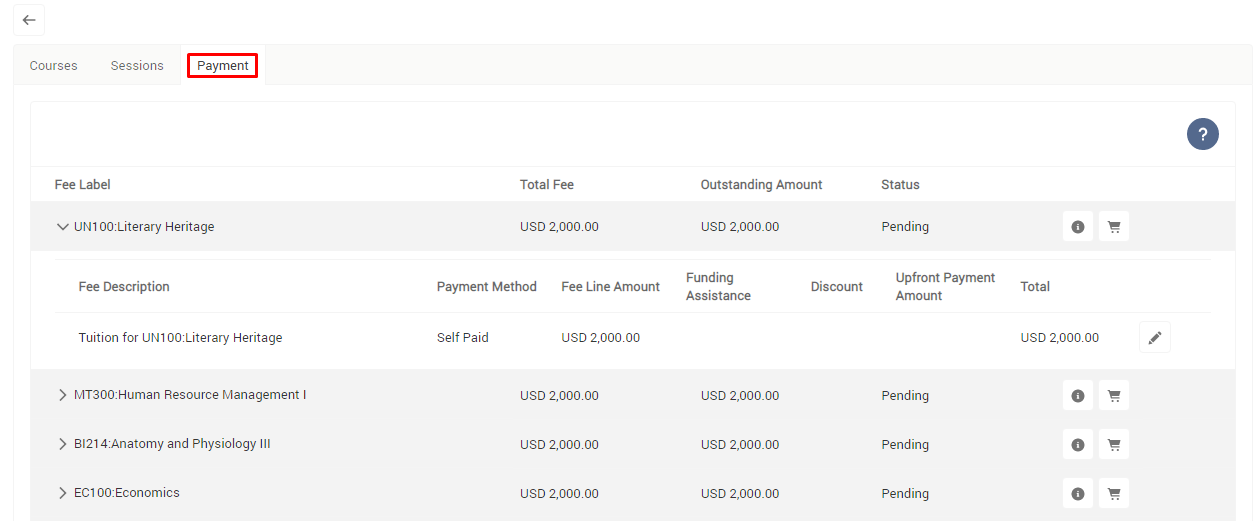
Viewing payment and fee details
The 'Payment' tab allows the user to view the details of Student Fees for enrolled Courses.
It also allows the user to make payments (note: Payments2Us needs to be set up).