RIO Ready: Setting up payment using Payments2Us
Table of Contents
To implement Payments2Us in RIO Education, we have 2 parts that needs to be done:
A. Prepayment page and components.
(This will be the bridge that allow us to access the Payments2Us payment page in the Community.)
B. Payments2Us itself.
(The actual app that will be doing the payment processing.)
Steps for implementing Prepayment components
1. Go to the Community Builder.
2. Create a new page.
3. Choose Standard Page.
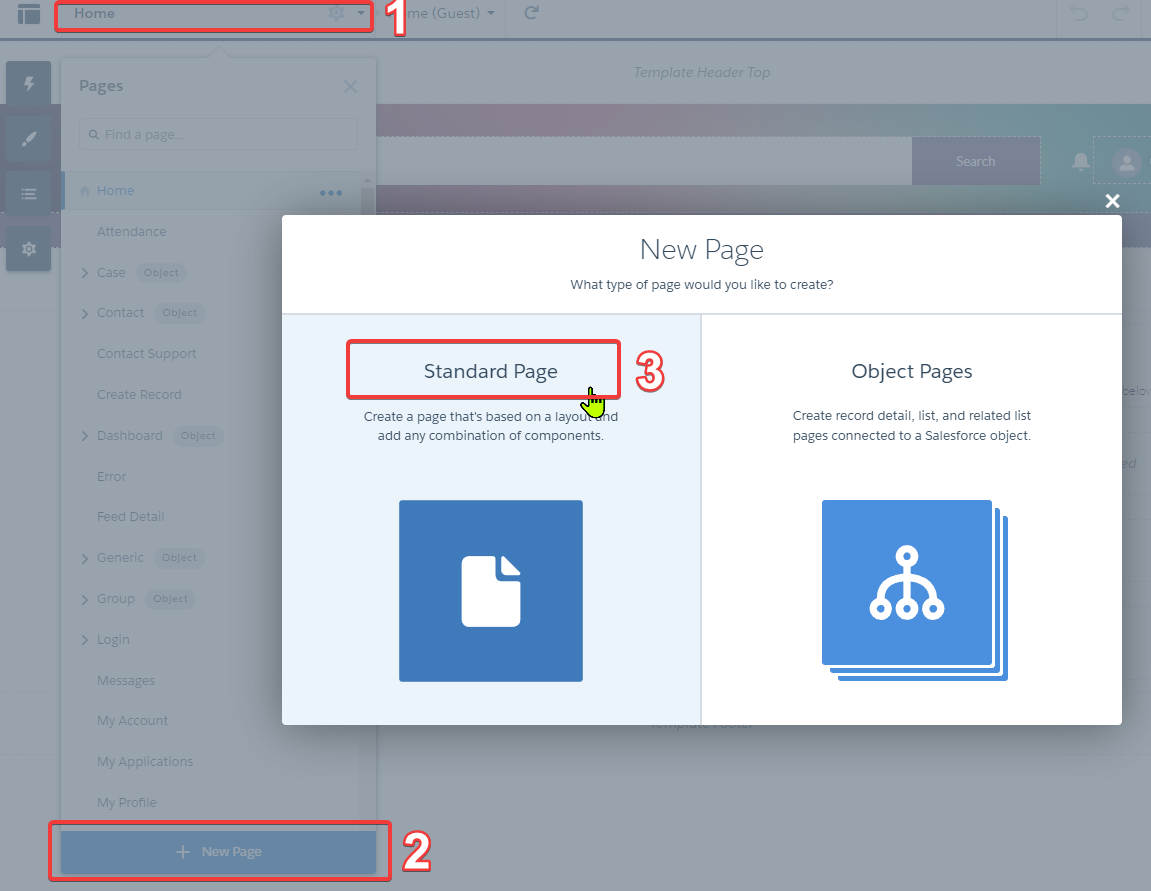
4. Choose + new Blank Page.
5. Choose Flexible layout.
6. In the next page put the Name as 'Prepayment', leave the default URL (which should be prepayment) and api name.
7. Once we are in the Prepayment page, drag out REDU Payment Confirmation custom component from the into the page.

8. We will see an error message similar to the screen below as the component will immediately attempt to run itself, but this is normal and the error message can be ignored.
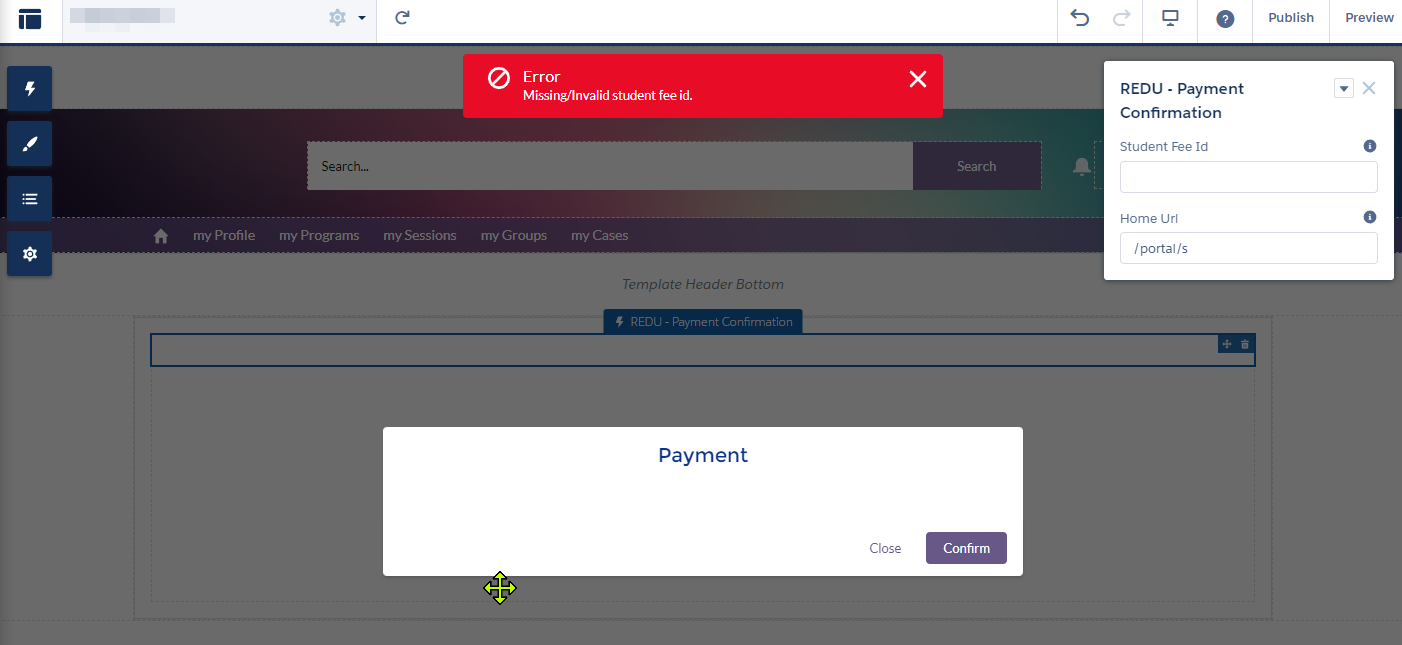
9. Set the Home URL with the page that the user should be redirected to when cancelling or closing the payment screen.

In the example above, we set the Home URL to be the My Program page.
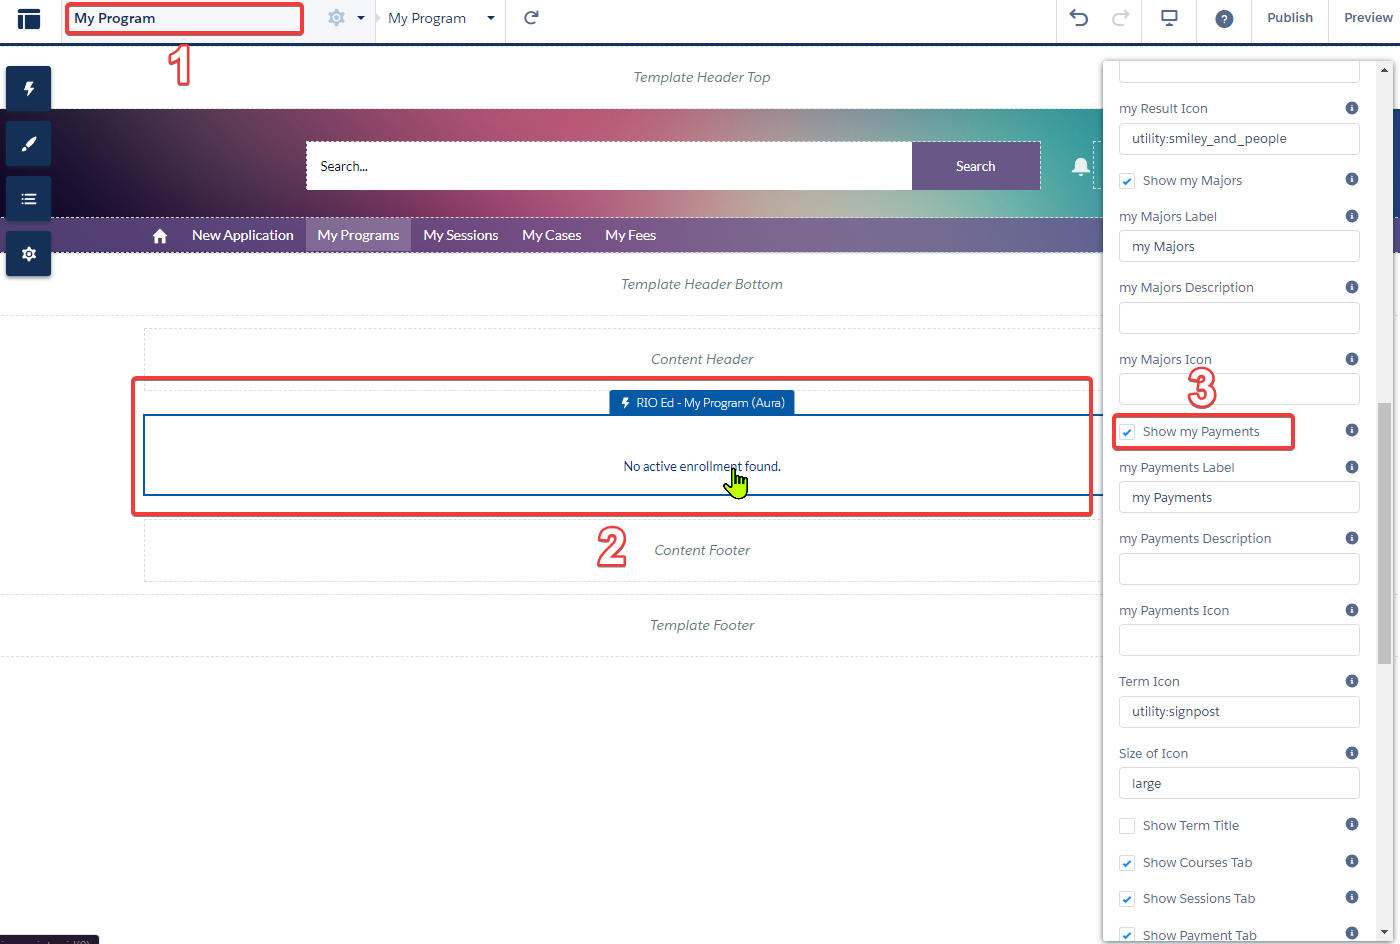
10. By default RIO Education payment is done in My Payments section located within My Programs page of the Student Community, but we must first enable it in the Community.
To enable it, go to the Community Builder -> My Program page, click on the RIO Ed - My Program (Aura) component and in the setting for it make sure 'Show my Payments' is checked.
Note: Remember that in order to see the changes to the Community that we just made, we must publish them.
11. Go to the Custom Setting, RIO Education Settings and find the field 'Payment URL' then edit it to input the value:
Note that if the new page created in step 2 was called something different, then replace prepayment in the value above that we put into the custom setting with the api name of the page.
12. To change the message to be displayed to the user when confirming the payment charge, find the custom label redu_PaymentHandler_Redirect_Message and change the value.
Steps for implementing Payments2Us
Full reference: https://help.payments2us.com/m/installation
Here is a summary of the minimum setup to enable Online Payment functionality after installing Payments2Us:
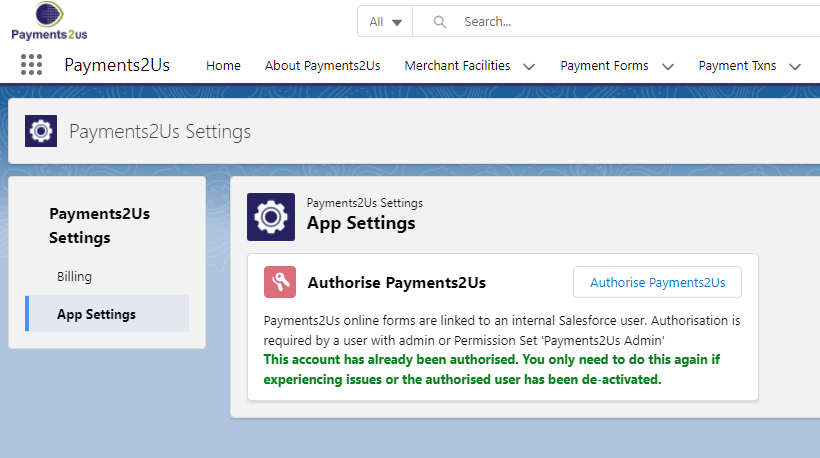
1. In Payments2Us setting, click on the create remote site setting button if the button is present, as well as Authorise Payments2Us.
Note: Make sure to follow the instruction given in the Authorise Payments2Us process and to grant access to the API when requested. If everything is completed successfully, we should see something like the following in Payments2Us Settings -> App Settings.
2. Setup the Sites.
Reference: https://help.payments2us.com/m/installation/l/824439-how-to-create-a-new-force-com-site
3. Setup the security for the Site.
Note:
If error is encountered when attempting to assign Permission Set for the Payment Site Guest User, check and make sure that the User is Active.
4. Setup the Sharing Settings.
Reference: https://help.payments2us.com/m/installation/l/1176028-how-to-setup-sites-sharing-settings
Note that for basic online payment, we only need to do the setup until section 4 of the sharing settings guide titled, 'Add Payment Txn Sharing Settings'. The rest of the setup in that page are only required if the use case described were relevant. In this guide we are only concerned with simple Online Payment and will not need them.
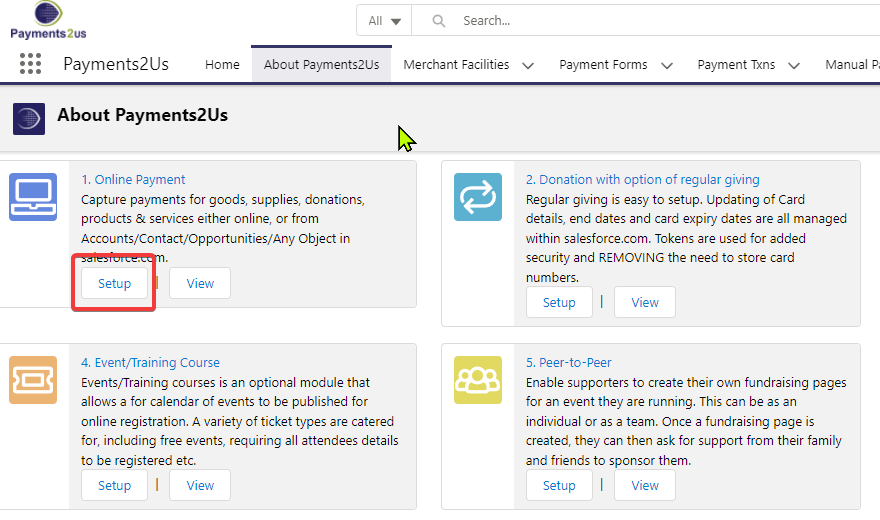
5. Go to About Payments2Us tab in the Payments2Us app, and click Sample Data to generate basic configuration we will use to setup our payment.
6. Still in About Payments2Us tab, once the sample data is created, click on Setup under the Online Payment section shown in the screen.
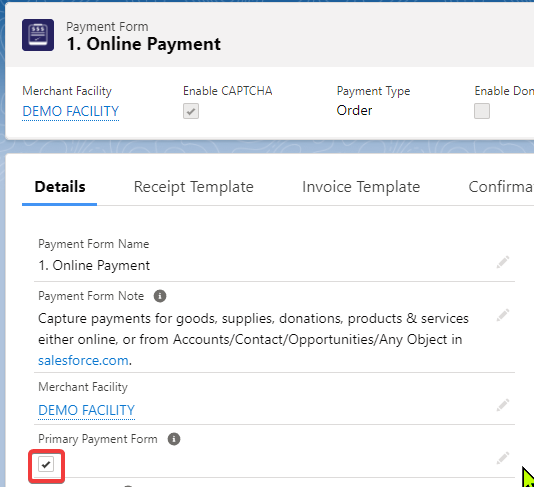
7. In the Payment Form we will see, set Online Payment as Primary Payment Form by checking the field shown below:
8. Next, note the lines on Webhook under the Orders/Supplies/Payments section.
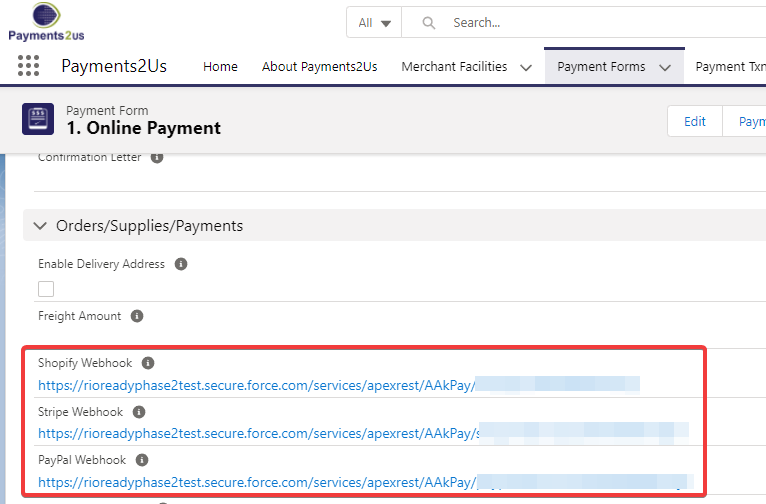
This will be needed in setting up the connection with the payment platform of choice.
In this example, we will be using Stripe to illustrate the process, so note the Stripe Webhook and copy the value we see in the record for the next part.
9. We will not be creating a new Merchant Facility for this example and instead reuse the sample Merchant Facility provided by the sample and edit it to suit our need instead.
Follow this guide to setup the configuration with Stripe. Note that if we are not using Stripe then this step will be replaced with the one corresponding to the payment platform of choice, for now we'll assume Stripe is chosen.
Reference: https://help.payments2us.com/m/installation/l/824458-how-to-setup-stripe
Replace the value of the fields in DEMO Facility with the one mentioned in the Stripe setup manual above, for fields not mentioned in the manual leave it as the original value that comes with DEMO Facility record.
In this example we also assume that the Primary Payment Form is 'Online Payment' so when instructed to click the Primary Form name from the related list, make sure to click on 'Online Payment'.
10. Make sure that the Merchant Facility (DEMO Facility) record is Active and Primary field is checked.
11. Put the ID of the Payment Form into the Custom Setting, RIO Education Settings under the field 'Payment Form ID'.
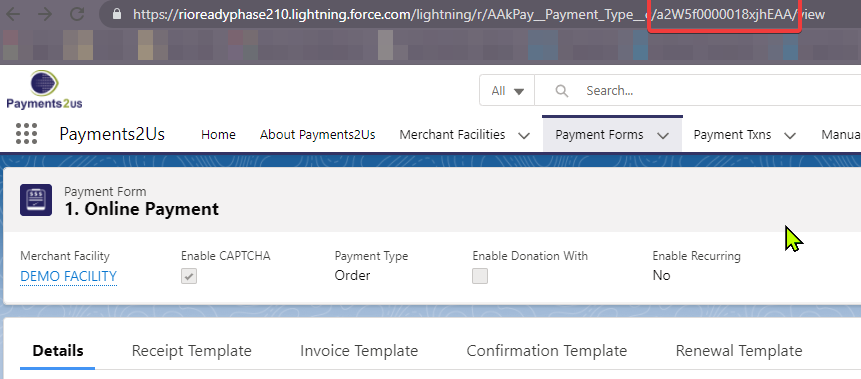
The ID can be seen in the URL as shown above when viewing the Payment Form record.
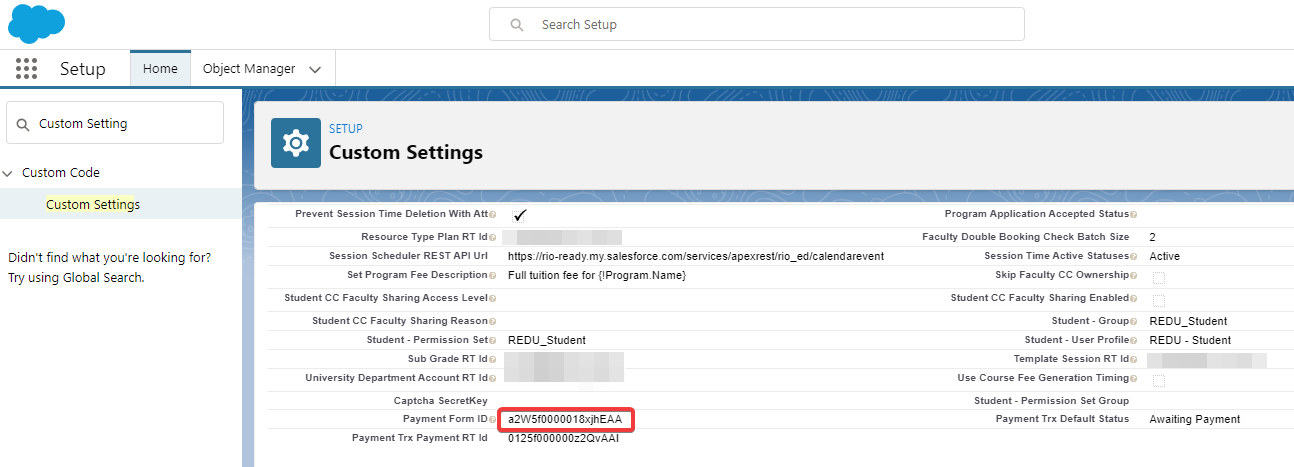
12. Put the Record Type ID for the Payment Transaction into the Custom Setting, RIO Education Settings under the field 'Payment Trx Payment RT Id'.
To find the RecordType ID value we can use this query in the anonymous console:
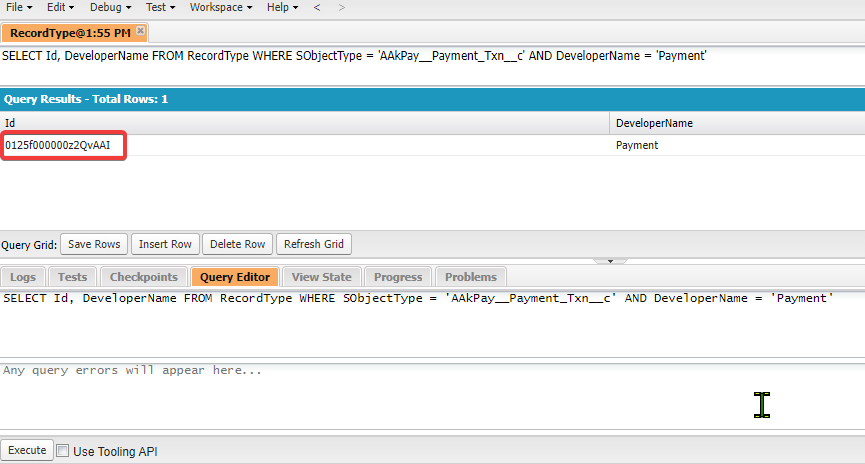
Copy the value, then put it into the Custom Setting as previously mentioned.
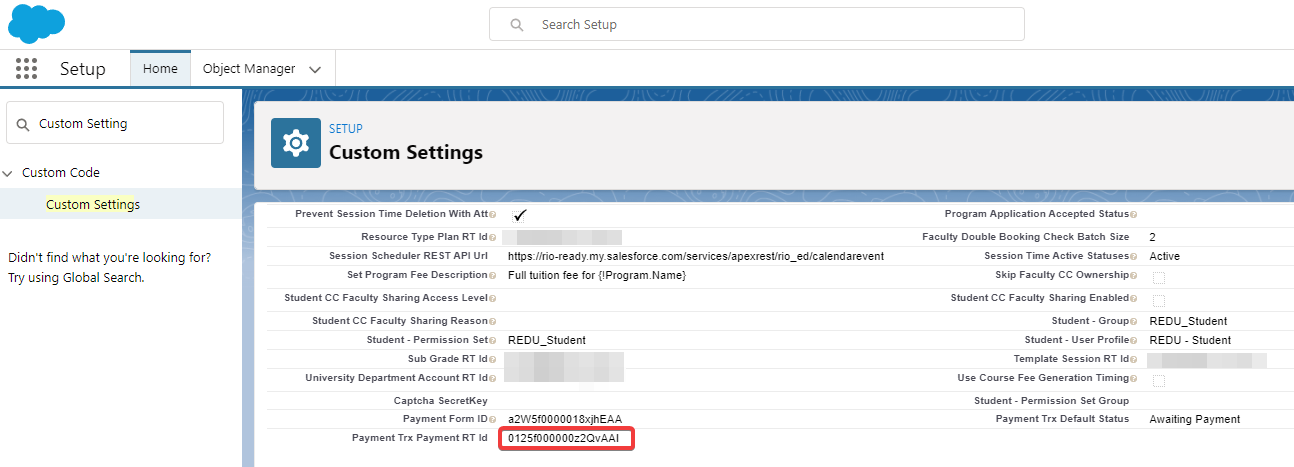
13. Put the value 'Awaiting Payment' into the Custom Setting, RIO Education Settings under the field 'Payment Trx Default Status':

And we're done with most of the configuration with only 1 last thing left which is to make sure that the Merchant Facility we selected knows the Site URL that we have created.
14. Follow the instruction here in order to make sure that the Merchant Facility (DEMO Facility in this example thus far) is configured correctly with our Site URL. Note that if the Payment Confirmation pop up shows up during the payment process but clicking on Confirm did not redirect properly into Payments2Us, then it most likely means that the Base Site URL in the Merchant Facility is not configured correctly.
Setting the Permission Set for the Student Users
We need to ensure that newly created Student for the Community are given the permission set "REDU Student Payment2Us Permissions".
If Login/Self Registration module is installed:
- Add the Permission Set "REDU Student Payment2Us Permissions" into the Permission Set Group "REDU_Student_Permission_Group" by going into Setup, typing into the Quick Find box, enter "Permission Set Group".
- Click on "Permission Sets in Group".
- Click on "Add Permission Set".
- Select "REDU Student Payment2Us Permissions" and then click Add.
If Login/Self Registration module is not installed, then please assign the Permission Set "REDU Student Payment2Us Permissions" to the new Student users either manually or with custom automation.
Enabling the Payment Trigger
We're almost done, next we need to enable the trigger that is responsible for registering the payment made in Payments2Us into a Payments record that can be tracked by RIO Education. This is necessary to ensure that RIO Education reflects the payment already made when displaying the user's Payment page.
To do so:
1. Open the Developer Console.
2. Go to Debug (on the top menu) -> click on "Open execute Anonymous Window".
3. Paste the following:
Where to find the payment page in the Community itself as a user?
In Default community that comes with RIO Education:
My Programs -> My Payments.
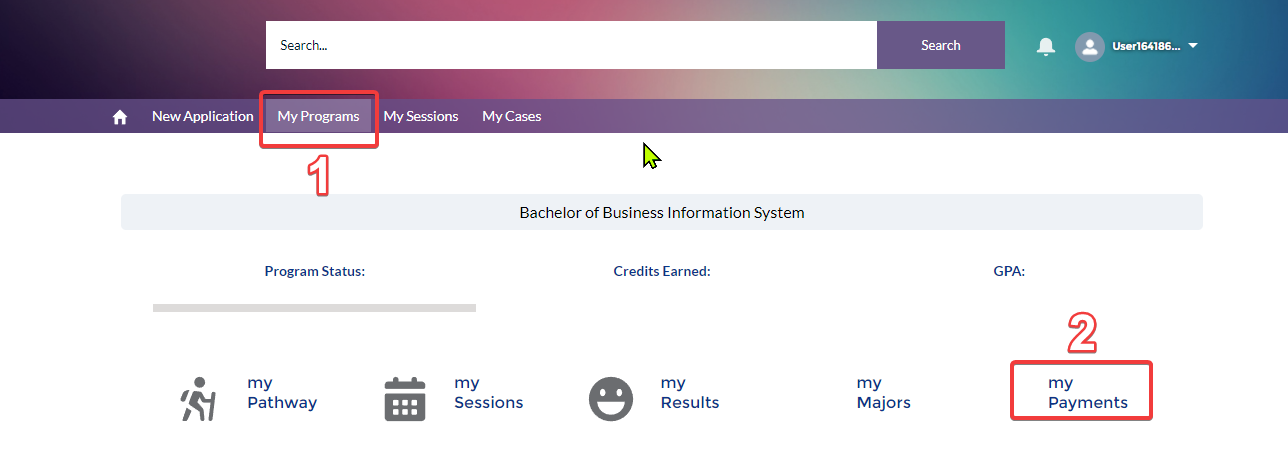
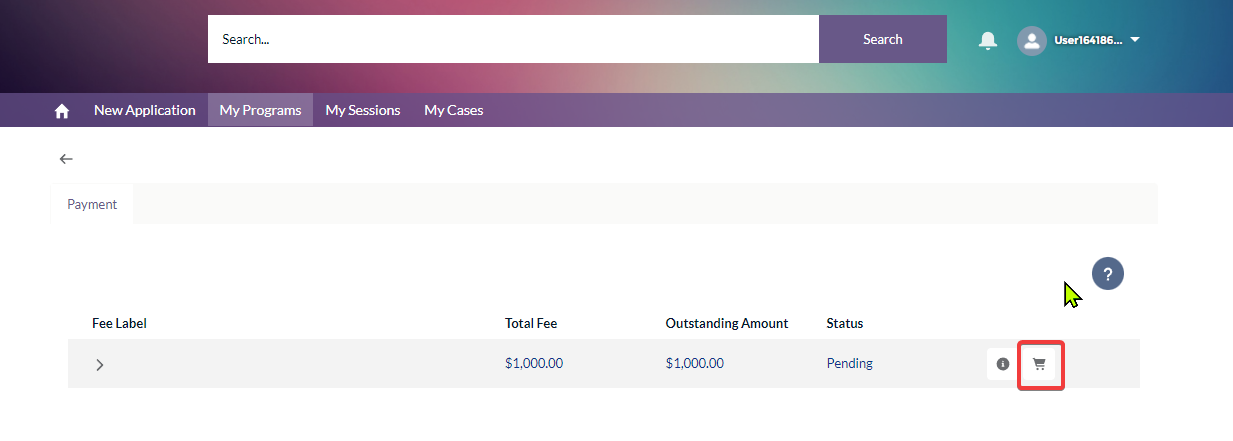
To make payment
If there is any payment to be made shown in the My Payments page, then click on the shopping cart icon to the right side of the amount status (next to the info icon).
Note: Make sure that popup is not being blocked by the browser for this page as the Payment Page will come out as a popup.

.png)
See also: