Table of Contents
Appointment Scheduler
You can choose to apply the metadata package after the upgrade or modify the profile manually.
The Appointment Scheduler is used to create appointments against Faculty members. For example, a student’s consultation with their guidance counselor.
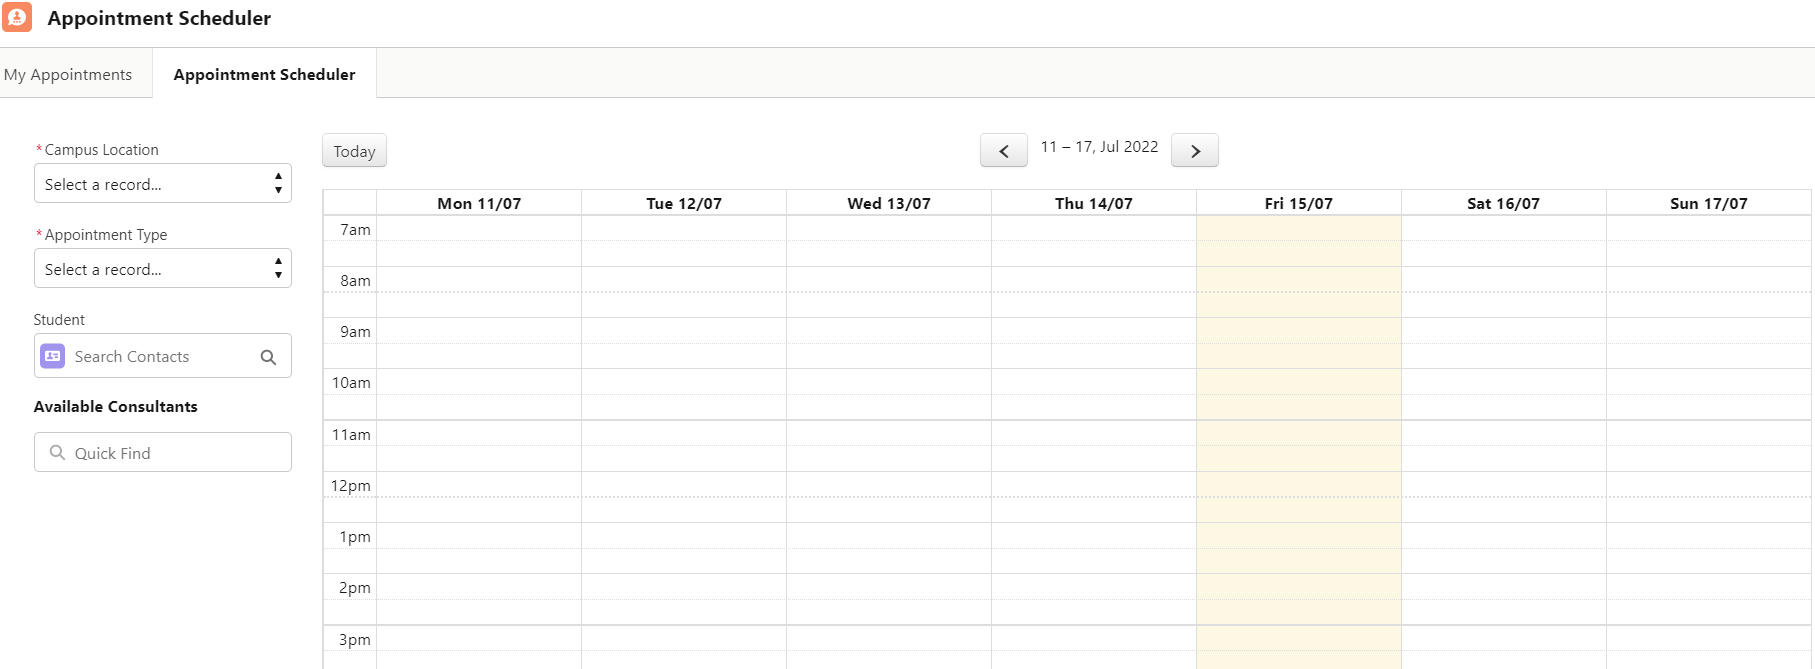
When the Scheduler is launched, no result will be displayed. A resource manager needs to select the filter fields to view availability.
Note: To enable features and buttons in the Appointment Scheduler, edit the page in the Lightning App Builder. You may also refer to the RIO Ed - Appointment Scheduler (Aura) component.
(Try out our RIO Challenge here for a practical exercise.)
Records that need to be created before booking appointments
Before you book appointments, see this section.
Consider a scenario where a student is looking to book a meeting appointment with a consultant.
The first thing to do, is to create these records.
| Records | Description |
| Appointment Type | The type of appointment (i.e. meeting). |
| Appointment Time | The range of days and time that the appointment can take place in a venue/facility. |
| Appointment Availability | Defines the availability of the Faculty contact (i.e. consultant) and facility (i.e. campus). |
| Assigned Location | Assigns the contact (i.e. consultant) to the facility (i.e. campus). |
| Availability Time | Defines the range of days and time that the contact (i.e. consultant) will be available. |
See the full guide here: Managing Appointment Type, Appointment Time, and Appointment Availability.
How to use the Appointment Scheduler
1. Click the Appointment Scheduler tab from the Navigation Bar or App Launcher.
2. Select the Campus Location.
Note that only the Campuses with active Appointment Time will appear.
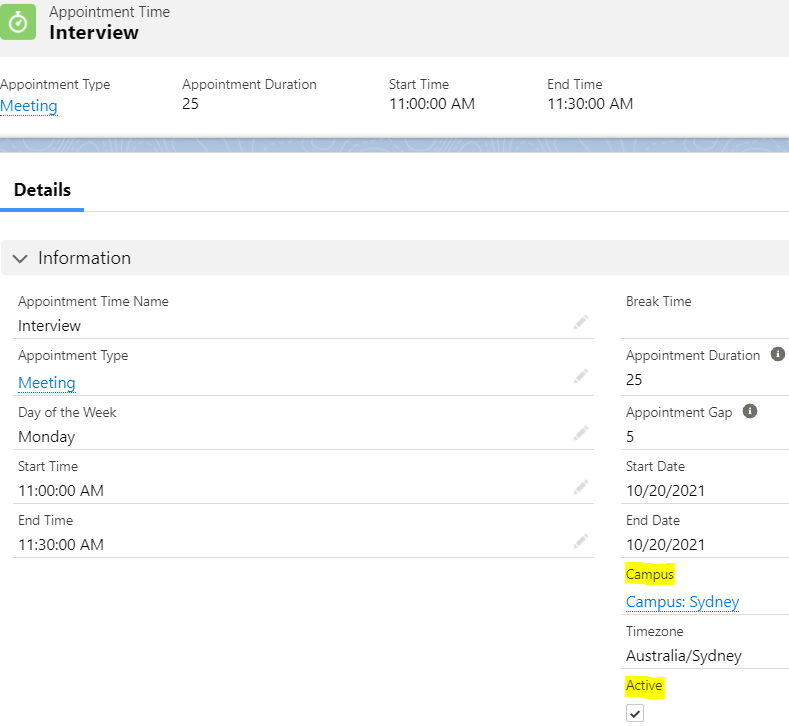
As part of the timezone issue fix (more on this in the section below), system administrator needs to update the Appointment Type configuration to create an active Appointment Time for each campus that is applicable.
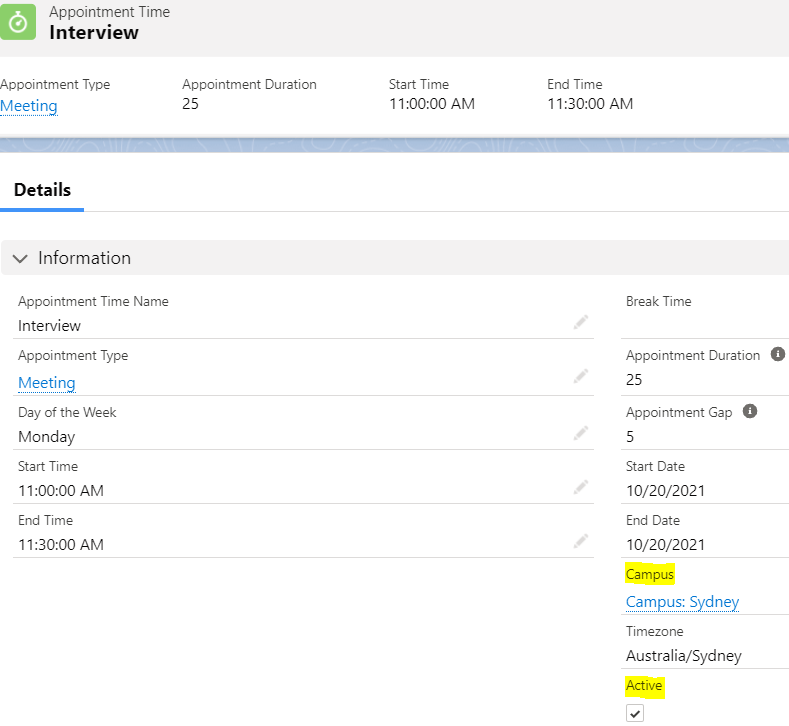
Important: Both the 'Campus' field and 'Active' checkbox must be set, in order for the campus to be available for selection in the Appointment Scheduler.
3. Select an Appointment Type from the list. Relevant faculty members that are linked to the Campus and Appointment Type will appear as well.
If the 'Allow Students to Book' field in an Appointment Type is checked, students will be able to view and book it themselves.
If Faculty members are viewing the Appointment Scheduler, they can view all Appointment Types.
But as of v3.10, a new field 'Allow Faculties to Book' is added to the Appointment Type. Only the Appointment Types with this new field checked, will be able to be viewed and booked by Faculty members.
This allows Faculty members to book slots and rooms.
- An Appointment Availability record will need to be created first.
4. Enter the student’s name in the Student field or leave blank if this appointment will be for this user.
(Note: Admin can configure a custom query used by the contact lookup field to search for students. See more in the section below.)
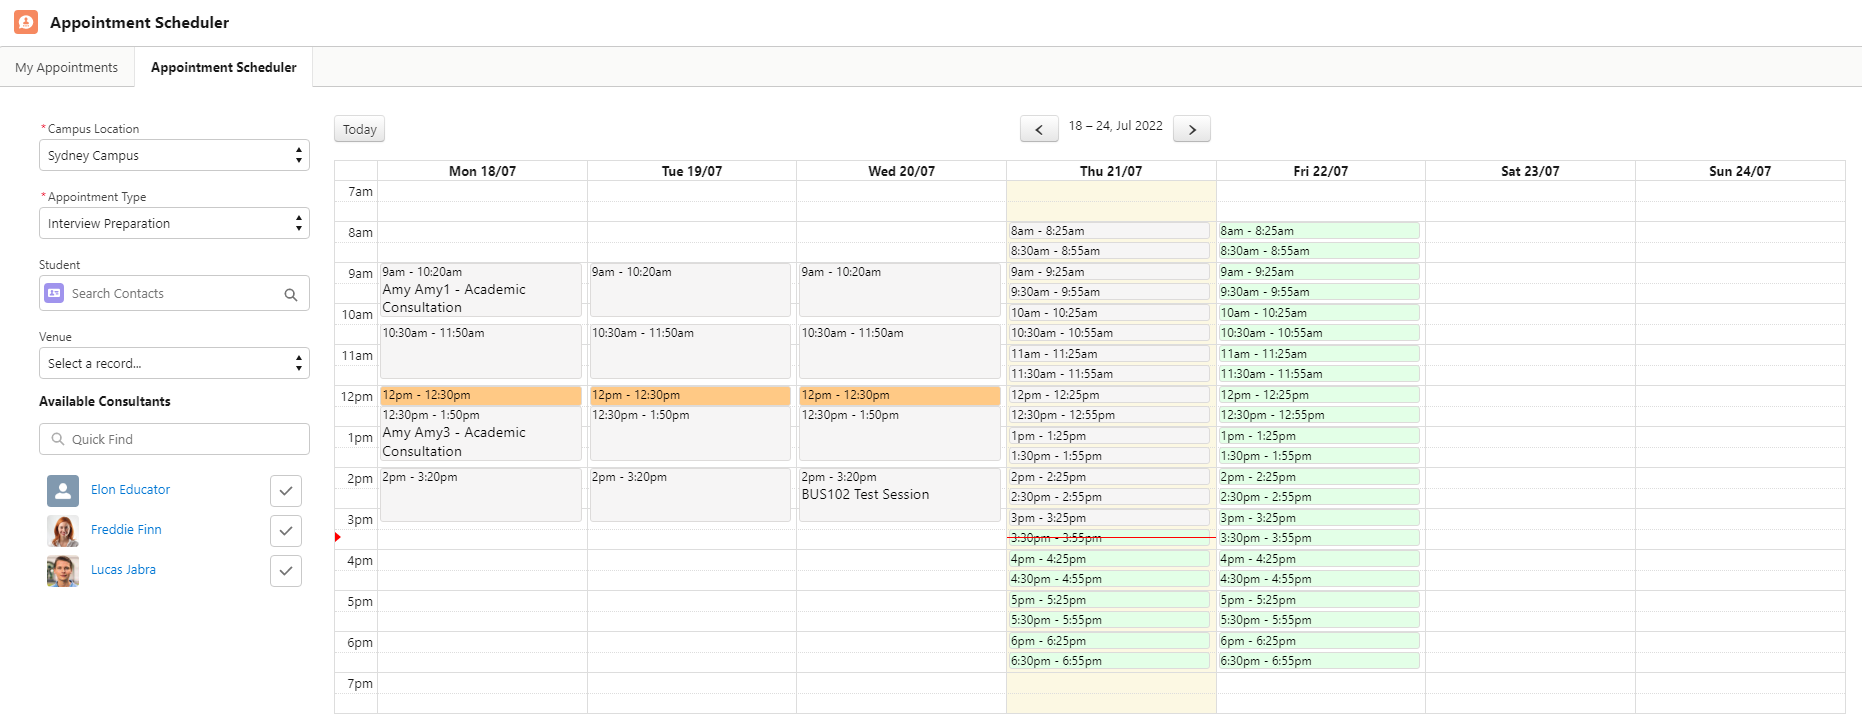
5. Select an open appointment.
- Available appointments will show up as green.
- Break times will appear as orange.
- Appointments that are not available will show up grey (users will be able to view the information of booked/unavailable slots such as the appointment, booking facility name, and contacts).
Note that as of v3.2, if a faculty member is on leave, it will be reflected in the Appointment Scheduler as well and appointment slots that fall within the leave will be unavailable.
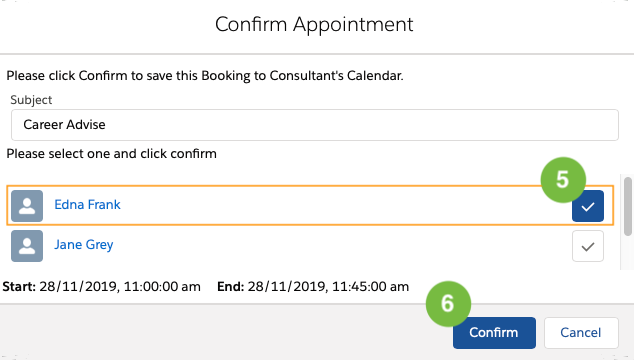
6. A pop-up screen will appear asking to Confirm Appointment.
- You can change the subject to custom text, if required.
- Highlight the checkbox next to the consultant to book an appointment with.
7. When complete verifying the consultant plus the appointment date and time, click Confirm to save the appointment.
- Note: The appointment time slot will go grey once saved if there is no further available consultants for that time slot, as it’s no longer available for further bookings.
Once an appointment is scheduled, it will be reflected in the 'My Appointments' tab of the Appointment Scheduler, for all the relevant attendees.
If the attendee clicks 'Confirm':
- Attendee’s status is updated in the calendar.
If the attendee suggests a new time:
- The appointment will be moved to the new time block for everyone’s calendar.
If the attendee rejects:
- The appointment will be displayed as ‘Cancelled’ in the all the appointment list of all attendees.
- The appointment will disappear on the calendar view.
Others
How to populate venue field
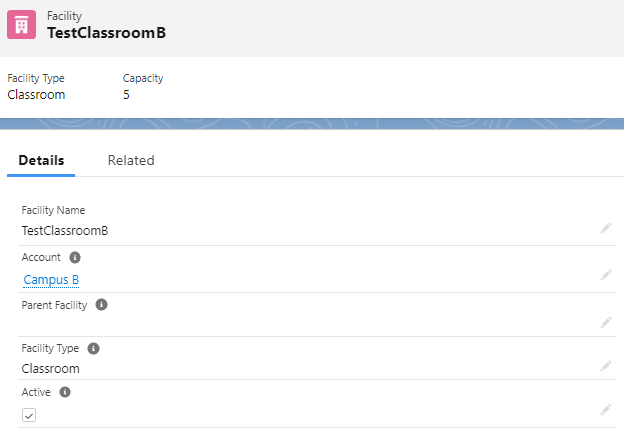
In order for a Facility to populate venue field while booking the appointment, the following conditions have be to fulfilled:
- The Facility is related to the selected Campus.
- The Facility has Appointment Availability to the Appointment Type.
- The Facility is Active.

See also: Managing Appointment Type, Appointment Time, and Appointment Availability
How to extend appointment end time
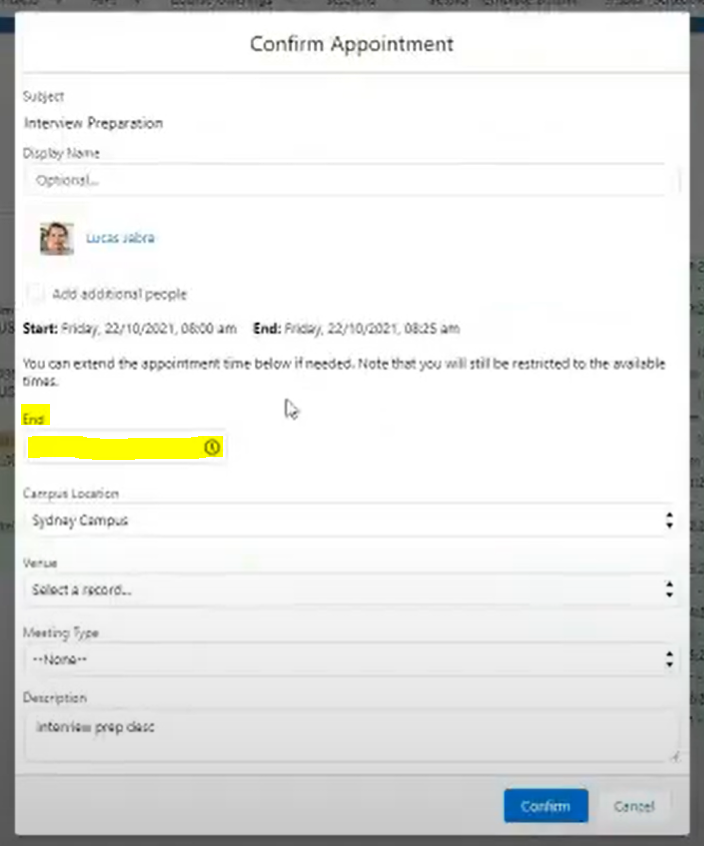
A user can allow editable time ("Editable Time" checkbox) when setting Appointment Type, thereby enabling an appointment's end time to be extended.
Timezone between campus locations
Prior to v3.2, if a user's Salesforce time setting is different than that of the campus location, any appointment booked for said campus will be set to the timezone of the user.
For example, if the user's Salesforce timezone is Malaysia, booking an 8 a.m. appointment for Sydney Campus will result in an 11 a.m. appointment over in Sydney.
RIO Education v3.2 has resolved this issue. The Appointment Scheduler will follow the timezone of the campus location, however, do remember to set it in Appointment Time.
Custom query in the contact lookup field to search for students
As of v3.5, two new configurable options are introduced:
- Use Custom Query For Contact Lookup - Checkbox to use custom query.
- Custom Query For Contact Lookup - Custom SOQL query.
Admin can configure a custom query to be used by the contact lookup field on the Appointment Scheduler. For example:
SELECT Id, Name FROM Contact WHERE MyCustomField__c LIKE :searchKey
Please note that it is important to include "Name" field as part of the query field and ":searchKey" for the matching key.
