Renewing your self-signed certificate
Table of Contents
You may get an email from Salesforce informing you that your self-signed certificate has expired.
If that is the case, you can follow the steps below to renew your certificate. We recommend doing this after hours.
As the self-signed certificate will be used in different configurations such as domain settings, identity provider configurations, single sign-on (SSO) settings, or connected apps in Salesforce, it is important to update the relevant configurations to use the updated certificate.
The following steps need to be repeated for orgs (sandbox etc) where the cert is expiring.
S-Docs Self-Signed Certificate
Step 1. Create new certificate
- From the setup menu, type "Certificate" into the Quick Find bar and click “Certificate and Key Management” in the dropdown menu.
- Click Delete for SDocsCert.
- Click Create Self-Signed Certificate.
- Set Label to SDocsCert.
- Set Unique Name to SDocsCert.
- Click Save.
- Click Download Certificate.
Step 2. Replace old certificate
The next steps are different in Salesforce Classic and Salesforce Lightning.
For Classic:
- From the setup menu, type "Apps" into the Quick Find bar, then click Apps (under Build > Create).
- Scroll down to the Connected Apps section, find "Sdocs Connected Apps," and click the Edit link next to it.
- Scroll down to Use digital signatures.
- Click Choose File and select the previously downloaded certificate.
- Click Save.
- It may take several minutes for the new certificate to take effect.
- Confirm that everything is working (test SDJobs with Mass Merge).
For Lightning:
- From the setup menu, type "App Manager" into the Quick Find bar, then click App Manager in the dropdown menu.
- Find the "Sdocs Connected Apps" connected app. Click the dropdown arrow on the right, and click View.
- Click Edit at the top of the page.
- Scroll down to Use digital signatures.
- Click Choose File and select the previously downloaded certificate.
- Click Save.
- It may take several minutes for the new certificate to take effect.
- Confirm that everything is working (test SDJobs with Mass Merge).
Issues
If S-Docs Jobs are not being created, ensure that the certificate's Unique Name matches the ConnectedAppCertificateName in Custom Settings | SDocsSettings. In most instances, this should be SDocsCert in your org.
Other Self-signed Certificate
- From the setup menu, type "Certificate" into the Quick Find bar and click Certificate and Key Management in the dropdown menu.
- Select the expiring certificate.
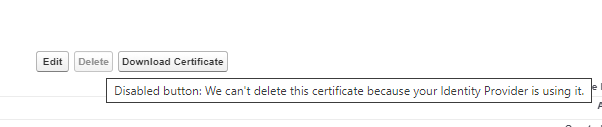
-
Hover over the ‘Delete’ button to see where this certificate is being used. In the example below, it is used in the Identity Provider.
- Navigate back to the Certificate and Key Management page. Click on "Create Self-Signed Certificate."
- Enter a meaningful label and unique name. Ensure the key size matches the original certificate key size.
- Click “Save”.
- From the setup menu, search for the configuration that is using the expiring certificate, such as Identity Provider in our example.
- Update the configuration to use the newly updated certificate, and you should now be able to delete the expiring certificate as it has been removed from the relevant configuration.